DLTK's Holiday Crafts for Kids
Mouse Box for Christmas Cards
(and
cookies)
 You can replicate the same type of craft using craft
foam by tracing the template pieces onto foam and drawing on a few of the details.
You can replicate the same type of craft using craft
foam by tracing the template pieces onto foam and drawing on a few of the details.
It turns out really cute just with paper though -- the directions assume you'll be doing it just with paper
Materials:
- paper
- glue
- scissors
- small empty box (we use kleenex boxes and shoe boxes)
- construction paper,
- Optional: thin cardboard (empty cereal boxes
work well).
- Optional: large wiggly eyes
Instructions:
- Print out the templates of choice and color them as appropriate.
- Wrap the empty box up with construction paper (or gift wrap) in an appropriate color (white, green or red would all work).
- Cut a slit in the top of the box large enough to fit Christmas cards
in the top.
- NOTE: You could also just cut the entire top off the box or use
a no-top box like a shoe box.
OR - Line the box with waxed paper and fill with Christmas candies or cookies.
- NOTE: You could also just cut the entire top off the box or use
a no-top box like a shoe box.
- Optional: Glue the templates to pieces of thin cardboard and Let dry.
- Cut out the template pieces.
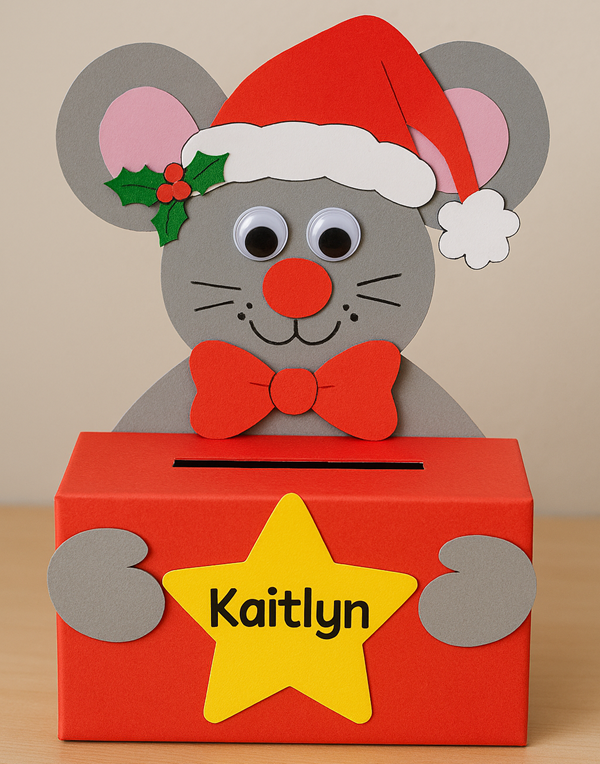
- Print the child's name on the large star (template 3).
- Glue pieces together:
- Head shape (circle on Template 1) should go on shoulders (Template 2).
- Glue the ears (Template 2) onto the head.
- Glue the ear middles (Template 1) onto the ears
- Glue the eyes onto the face.
- Glue the nose onto the face.
- Glue the bow as a bowtie (Template 3) below the face.
- Glue the hat (Template 3) onto the head
- Glue the holly (Template 3) where ever you like to decorate
- Glue the whole body onto the back of the box, facing over the top (so it looks like he's sitting behind the box, holding it... See picture at the top of this page if you don't understand).
- Glue the star (template 3) onto the front of the box
- Glue the paws to the front of the box, overlapping the star slightly.
Printable Craft Templates:
- After printing, close the template window to return to the main page.
- If the template doesn’t fit on one page, adjust your printer margins:
• In most browsers: Print → More settings → Margins → Minimum
• Or use Page Setup / Printer Setup in your printer dialog
Template 1 (head) (color) or (B&W)
Template 2 (ears) (color) or (B&W)
Template 3 (hat) (color) or (B&W)
Printable version of these instructions

