 DLTK's Holiday Crafts for Kids
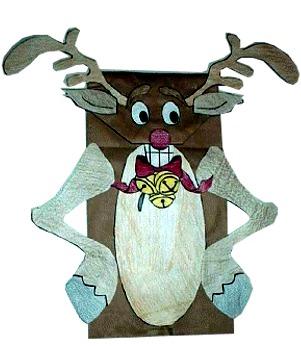
Reindeer Paper Bag Puppet
The paper bag puppets seem to be popular with both of my girls (Ages 3 and 6)!
OPTION: Instead of using the template antlers, cut handprints from brown paper and use those!
Materials:
- paper bag,
- a printer
- glue
- scissors
- something to colour with and
- a piece of paper.
Instructions:
- Print out the craft template of choice.
- Colour the pieces as appropriate and cut them out. (cutting may require adult assistance and can be pre-done).
- See the picture above for how the puppet should look when complete.
Get Familiar with your Paper Bag:
- I'm going to walk through this slowly. Look at your paper bag.
- It should be closed and flat like a piece of paper. Just like when they are brand new.
- On one side, it's all smooth. This will be the BACK of your
puppet.
- It's important that all the kids get the back
and front straight at the beginning!
- It's important that all the kids get the back
and front straight at the beginning!
- On the other side there's a flippy tab (which is
typically the bottom of the bag when you're carrying your lunch around...)
- This flippy tab will be the HEAD.
- Lift the flippy tab up a bit. Underneath of the
tab will be the mouth,
- When the child puts her hand in the bag,
she'll be able to make the puppet talk.
- When the child puts her hand in the bag,
she'll be able to make the puppet talk.
- Look at the rest of the front of the bag. (The 3/4 or so of the bag below the part with the flippy tab) This will be the BODY.
- Look at the sides of the bag. There should be a FLAP of paper.
- We'll be slipping the arms (template 1) into
this flap.
- We'll be slipping the arms (template 1) into
this flap.
- If the kids goof and glue the arms onto the front or back of the bag, it isn't a big deal.
- OK, now that we're comfy with our bags, let's craft!
 PUTTING IT TOGETHER:
- Fold the corners of the flippy tab under to make the HEAD more triangular.
- Glue the nose to the bottom of the newly made triangular head.
- Glue the mouth under the flippy tab we let the teeth stick out a bit.
- Glue on the eyes, eyebrows, antlers and ears. You can reinforce the antlers with cardboard if they're too floppy (if you printed on construction paper, they should be ok without reinforcement)
- Glue the arms into the FLAP.
- Glue the oval "ruff" onto the front of the bag.
- Glue the bells under the chin.
Templates:
- After printing, close the template window to return to the main page.
- If the template doesn’t fit on one page, adjust your printer margins:
• In most browsers: Print → More settings → Margins → Minimum
• Or use Page Setup / Printer Setup in your printer dialog
Template 1: (color) or (B&W)
Template 2: (color) or (B&W)
Template 3: (color) or (B&W)
Printable version of these instructions