DLTK's Holiday Crafts for Kids
Really BIG, Stuffed Newspaper Frankenstein Craft
 Sometimes, bigger is better. The girls had SO
much fun making these larger than life crafts. There's something
wonderful about creating a project that requires daddy's help to
hold...
Sometimes, bigger is better. The girls had SO
much fun making these larger than life crafts. There's something
wonderful about creating a project that requires daddy's help to
hold...
Tasha (6) and Kaitlyn (2) both enjoyed this project!
BUT, I know not all of you have the paint or the display space for such a HUGE craft. If this is you, try our SCALED DOWN VERSION (less time, fewer materials, smaller end product).
Materials:
You have to have the newspaper and some green paint. The rest is easily substituted (I've put OPTIONS in red text throughout the instructions).
BODY:
- newspaper,
- green paint (we used washable tempra paints -- about $1.00 Canadian worth of paint was used on the craft)
- something to sew up the sides... either:
- stapler
or - hole punch and string/wool
- stapler
NOSE/EARS:
- green construction paper
or - use spare bits like craft foam, styrofoam
packing peanuts or cardboard to make up your own.
or - use our template piece.
METAL PLUGS:
- I'm not sure what these are called (the little metal things that come out the side of his head), but we used an aluminum pie plate cut up for ours. You could also wrap cardboard in aluminum foil or use our template piece.
HAIR/SCAR/MOUTH:
- black paint or black marker
EYES:
- Either use our template pieces (bottom of page) or
make your own eyes with:
- small paper plates or white paper cut in a circle
AND - blue or green construction paper or white paper cut in a circle and painted or colored blue or green
AND - styrofoam ball cut in half OR 2 egg carton cups OR small circle of black construction paper.
- small paper plates or white paper cut in a circle
Instructions:
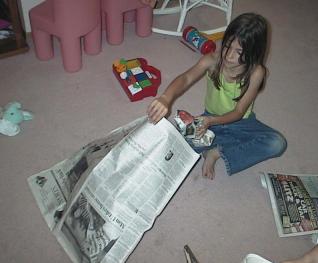 Take eight full sheets of newspaper and lay them
on top of each other (it's best if the top and bottom sheets are just black and white as it's harder to paint over the colored newspaper).
Take eight full sheets of newspaper and lay them
on top of each other (it's best if the top and bottom sheets are just black and white as it's harder to paint over the colored newspaper).- Staple all the way around 3 sides
- OPTION: instead of stapling, punch holes with the hole punch all the way around. Use string or wool and sew up three of the sides.
- Open up your pouch, so there are four sheets of newspaper on either side. Stuff with crumpled up newspaper.
- Staple or sew the fourth side shut.
 Paint the pouch green
- You can see in the photo that I just poured paint all over the paper and Tasha spread it around with the biggest paintbrush we had. You could also use a sponge or a rag to spread it around.
- Let dry (you can work on the eyes, while the body is drying).
- If you're hanging your monster from the wall, you only have to do the front. If you're hanging it from the ceiling, you may wish to paint the back at this point
 Make your eyes however you want (you can use the
template pieces we provided). This may be a good time to set out a
variety of materials and let your kids choose how they want to make their
eyes (let them show off their creativity)
Make your eyes however you want (you can use the
template pieces we provided). This may be a good time to set out a
variety of materials and let your kids choose how they want to make their
eyes (let them show off their creativity)
Here's how we made ours:
- Cut a styrofoam ball in half (OPTION: you could use two egg carton cups instead or two circles of black construction paper).
- Paint them black (or color with black marker)
- Cut two circles out of white paper and paint or color them blue or green (or cut them out of blue or green construction paper)
 Assemble the eyes:
- Glue the black eyeballs to the yellow circles and the green circles to two small paper plates (or pieces of white paper, cut in circles).
- Glue these eyes to the green body (it will likely be dry enough at this point).
- Paint or color on hair, a scar and a mouth (black paint or black marker).
- Cut ears out of construction paper (or our template) and staple, tape or glue to the side of the head.
- Draw or glue on a nose (we used a styrofoam packing peanut for ours).
 Cut metal knobs out of a tin pie plate or aluminum foil
or use our template. Staple, tape
or glue to the side of the head.
Cut metal knobs out of a tin pie plate or aluminum foil
or use our template. Staple, tape
or glue to the side of the head.
Templates:
- After printing, close the template window to return to the main page.
- If the template doesn’t fit on one page, adjust your printer margins:
• In most browsers: Print → More settings → Margins → Minimum
• Or use Page Setup / Printer Setup in your printer dialog
Template for eyes (print 2) (color) or (B&W)
Template for metal plugs (color) or (B&W)
Template for ears (color)
or (B&W)
Printable version of these instructions

