 DLTK's Holiday Crafts for Kids
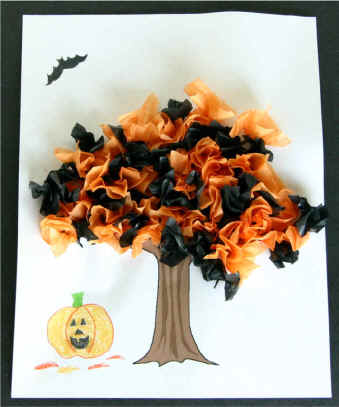
Halloween Tree Paper Craft
I think this simple little cut and paste craft turned out very cute!
There are a variety of versions to the craft to add complexity for older children.
The craft is simple enough for young kids to contribute but still fun for even mom to
make. I like doing the tissue paper version but it's tough for
preschoolers to make -- the templates are more appropriate for them.
There are a number of variations on this craft depending on which
templates you print:
- Template Version (younger children): print the trunk template and the leaves template and paste them together.
- Tissue Paper Version (older children): cut 1.5 inch squares of tissue paper, wrap around the eraser end of a pencil and glue to the trunk template.

Rather than using the Trunk template, you can decorate a "homemade" trunk (to make the trunk, trace your child's arm from the elbow up, including the fingers)
 Materials:
- printer,
- paper,
- scissors,
- glue,
- something to colour with (for B&W version and to add ghosts, pumpkins, etc).
- Tissue Paper Version only - you will also need:
- tissue paper in black and orange (about 1/2 a standard sheet of orange and 1/4 of black) -- although these are odd colors for tissue paper, they aren't tough to find near Halloween.
- Standard pencil with an eraser.
Instructions - Template Version:
- Print out the craft template of choice.
- Colour pieces, as necessary. (For a change of pace, try using different mediums than you typically do, such as paints or pastels).
- Cut out the bats and leaves. This step may require adult assistance.
- We cut out our trunk and glued it to a piece of black construction paper -- you could just decorated the template page with the trunk on it instead.
- Glue the leaves onto the tree. I like using a glue stick for the template pieces.
- Glue the bats onto the tree or the surrounding paper. I like using a glue stick for the template pieces.
- Use crayons, paints or collage materials to further decorate the page (if you've used a black construction paper background, white pencil crayon ghosts look spooky!).
 Instructions - Tissue Paper Version:
- Print out the trunk or make one by tracing the child's hand (with finger's spread) and arm about half way up to the elbow.
- Colour the trunk if using the B&W version. (For a change of pace, try using different mediums than you typically do, such as paints or pastels).
- Cut black and orange tissue paper into 1.5 inch squares. We put all our squares in a margarine container so they wouldn't fly around and make a mess when someone walked by our work space.
- Squeeze glue on about 1/4 of the tree (liquid glue works much better than a glue stick for this project).
- Wrap a tissue paper square onto the eraser end of a pencil.
- Place the tissue paper onto the tree by pushing the eraser end of the pencil (wrapped in tissue paper) onto a spot with glue.
- Continue placing squares of tissue paper, mixing the colors, until the tree is nice and full.
- Use crayons, paints or collage materials to further decorate the page.
Printable Craft Templates:
- Close the template window after printing to return to this screen.
- Set page margins to zero if you have trouble fitting the template on one page (FILE, PAGE SETUP in most browsers).
Tree Trunk Template (color) or (B&W)
Leaves and Bats Template (color) or (B&W)
Printable version of these instructions
 Easy owl themed activities for young kids this Halloween
 Tissue Paper Flower Vase - fun craft kids can make to decorate the house