DLTK's Holiday Crafts for Kids
Coat Hanger Wings
Materials:
 three wire coat hangers
- needle nose pliers
- wire cutters
- duct tape (go dad go *grin*)
- Material, gift wrap or thin cardboard
- needle and thread or hot glue gun.
- wool or elastic
Instructions:
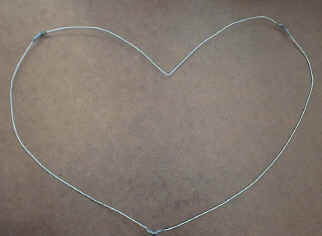 Cut the top (the hook) off the three coat hangers.
- use needle nose pliers to straighten the hangers.
- use needle nose pliers to make a loop on each end of all the hangers.
- Put the loops together and squeeze them closed to make one big ring of hangers.
- Cover the loops well with duct tape.
- bend the ring of hangers into a heart shape.
- Cut out the material, gift wrap or cardboard into the same shape as the
wings, but about 1 inch bigger.
- visit the local thrift store and purchase an inexpensive old dress, blanket or shawl -- use the material from that.
- If you choose gift wrap or cardboard the risk of the wings being damaged is greater.
- Use stitches or hot glue to attach the material (gift wrap or cardboard) to the coat hanger frame.
- Have one adult hold the wings up to the child about where you want them --
have the child hold their arms out (like a T shape)
- using a hole punch or a wool needle thread a long piece of wool or elastic, poke through the wings under one arm and poke it back through over the shoulder. Tie a bow in the back
- repeat on the other side
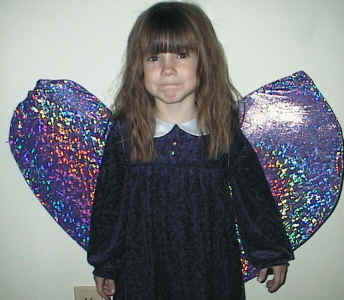
NOTE: whatever method you use to make wings for a costume, don't make them too large -- especially for small children. If it's a windy evening when you're walking around, they'll literally be blown off their feet if their wings are too big *grin*
Printable version of these instructions