DLTK's Holiday Activities
Mother's Day Flower Pot Hanging

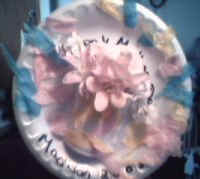
Tasha made this for me a when she was 5 and I still have it hanging on my wall!
Materials:
- large paper plate
- styrofoam cup (you only need 1/2 a cup for each craft)
- paint
- glue,
- string or ribbon,
- hole punch,
- green tissue paper
- Optional: flower colored tissue paper (yellow, pink, blue or purple all work well).
Craft Instructions:
- Have the children paint the paper plate.
- Cut the styrofoam cup in half (an adult's job) and paint it too if you like (you can see from the photo above that the kids sponge painted the cup.
- Let dry.
- Glue the cup onto the plate.
- Let dry.
- Punch a hole in the top of the plate.
- Put a string or ribbon through.
- Tie the ribbon so you have a loop that would go over a doorknob or a pin so mom can hang it up.
- Cut pieces of green tissue paper (about 4 inch by 4 inch pieces).
- Children can do this with safety scissors as the cutting doesn't need to be exact.
- Tuck these pieces into the cup (they look like leaves).
- Cut one long strip of green tissue paper about 4 or 5 inches wide.
- Accordion fold (fan fold) the piece as tightly as the kids are able.
- Keeping it folded, cut thin strips
- tuck them into the cup (they look like grass).
- Optional: Write HAPPY Mother's Day, the child's name and/or the year along the top.
- Optional: Cut pieces of flower coloring tissue paper about 4 inches by 4 inches.
- Stack 4 pieces on top of each other (you can use different colors) with a dab of glue in the center between each layer.
- Stick the eraser end of a pencil in the center (where the glue dabs are) and scrunch the flower up around the pencil.
- Remove the pencil and tuck the flower(s) into the cup.
OR
- Alternative OPTION: Cut simple flowers from construction paper or cardstock.
- Cut a circle around a photo of the child and glue to the center of the flower.
- Glue the flower onto the paper plate above the cup.
- Glue a strip of green paper as a stem below the flower (down to the cup) or draw a stem with a marker
- for this option to work, you need a fairly small photo of the child.
 Note from a viewer
(Thanks Gina!): Here's a variation of your original idea. Simply glue silk flowers in the center of a paper plate. Rip up
pieces of complimentary colored tissue paper and glue around the edge of the plate.
Note from a viewer
(Thanks Gina!): Here's a variation of your original idea. Simply glue silk flowers in the center of a paper plate. Rip up
pieces of complimentary colored tissue paper and glue around the edge of the plate.
Printable version of these instructions