DLTK's Crafts for Kids:
 Easy Saint Patrick's Day Kleenex Box Cover
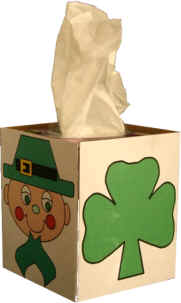
Materials:
- thin cardboard (old cereal boxes work well!)
- printer,
- paper,
- something to color with (if using B&W template)
- scissors,
- glue.
Craft Instructions:
- Print out the templates of choice (you can use all the same template so you have the same picture on all sides, or you can mix and match!) -- you need 4 templates to make one kleenex box.
- Colour pieces, as necessary.
- Glue the pieces onto squares of thin cardboard (old cereal boxes). Using a glue stick instead of white glue keeps the paper from wrinkling. If you are using white glue, put the glue onto the cardboard, not the template and then spread it around so it's a very thin layer.
- Cut out the pieces. This step may require adult assistance.
- Optional: cover with clear contact paper (this makes it water
proof). Contact paper can be purchased in rolls at your local
office supply store.
- Optional: Score the tabs -- to do this, flip the template over so the cardboard is up. Put a ruler down to help you keep a straight line. Using scissors or a butter knife, run along the ruler pressing hard to make it easier to fold the edges. This step may require adult assistance.
- Fold the tabs.
- Use glue or tape to attach the tabs of one template to the untabbed side of the next to form a box.
- Slip it over top a square kleenex box! (it squashes flat for easy storage so you can pull it out next Saint Patrick's Day).
Printable Craft Templates:
- Close the template window after printing to return to this screen.
- Set page margins to zero if you have trouble fitting the template on one page (FILE, PAGE SETUP or FILE, PRINTER SETUP in most browsers).
Templates
(pictured in photos above)
Happy Saint Patrick's Day |
(color) |
(B&W) |
Leprechaun Face |
(color) |
(B&W) |
Leprechaun with Gold |
(color) |
(B&W) |
Luck o' the Irish |
(color) |
(B&W) |
Pot of Gold |
(color) |
(B&W) |
Shamrock |
(color) |
(B&W) |
Printable version of these instructions