DLTK's Holiday Crafts for Kids
 Handprint Flowerpot Craft
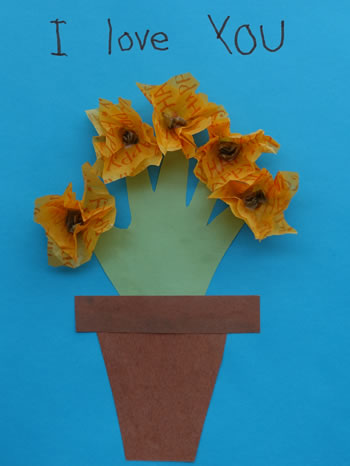
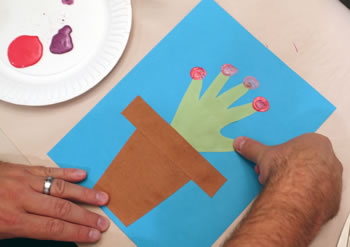
You can make a handprint flowerpot as a greeting card gift for Grandpa, mommy or anyone else who loves flowers or gardening.
There are a few variations of the craft for younger or older children so it's suitable for most ages to make or at least help with. The two main versions of the craft are:
- tissue paper flowers
- fingerprint or q-tip flowers.
 Materials:
- glue,
- scissors,
- background piece of paper, cardstock or construction paper (we used blue)
- Materials for the flowerpot:
- printer and paper if using the template provided for the flowerpot
or - brown or orange construction paper (or whatever color you would like to use for your flowerpot.
- printer and paper if using the template provided for the flowerpot
- Materials for the handprint:
- if making a painted handprint: green fingerpaint and white paper
or - if making a traced handprint: green construction paper and a pencil
- if making a painted handprint: green fingerpaint and white paper
- Materials for the flowers:
- if making tissue paper flowers: colorful tissue paper -- either that you've purchased or recycled from birthday gifts (it can be a bit scrunched up!) or colorful tissue paper that you've made yourself from white tissue paper or coffee filters, watersoluble children's markers and a few drips of water/spray bottle.
or - if making fingerpainted or q-tip painted flowers: colored paints (fingerpaints or acrylic paints work)
- if making tissue paper flowers: colorful tissue paper -- either that you've purchased or recycled from birthday gifts (it can be a bit scrunched up!) or colorful tissue paper that you've made yourself from white tissue paper or coffee filters, watersoluble children's markers and a few drips of water/spray bottle.
 Instructions:
- If using the template flowerpot, print it out in either color or black and white.
- Color or paint the black and white template in whatever color you would like. This will be your flowerpot.
- Cut the thin rectangle off the top of the template. Leave the other piece uncut (we'll create our flowers on the large area of white on the template)
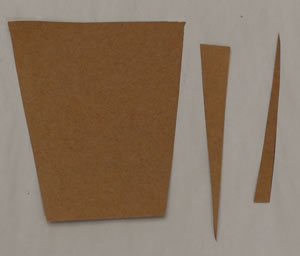 If using construction paper to make your own template:
- cut a square shape from construction paper that's a little bigger than the child's hand (it doesn't have to be perfect). Then cut two skinny triangles off the left and right sides of the square to make your pot shape.
 cut a thin rectangle shape from the same color of construction paper that's longer than the square you cut to make the pot. This will be the lip of the flowerpot.
- Use a q-tip and glue or a gluestick to glue the large piece of your flowerpot onto your background paper (if you're using the template, you can skip this step).
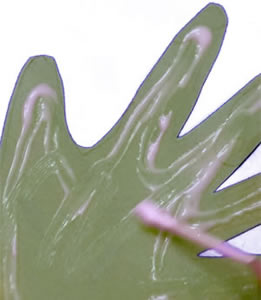
- Now either stamp a green handprint with fingerpaint just above the flowerpot on your background paper -- set it aside for a bit to dry while you tidy up the mess you've made up until this point.
or
 trace a handprint onto green paper and cut it out.
For this craft, we'd like our fingers to be nice and spread out as each finger is going to be the stem of one of our flowers.
Children either love or hate fingerpaint -- my girls have never been able to stand getting their hands gooey so we always trace our hands! Tracing your hands is also my preference as you don't have to let them dry. 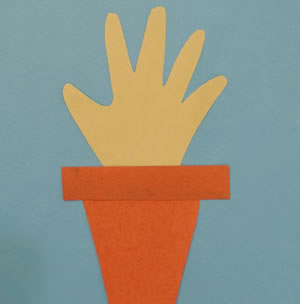 Glue the green handprint just above the flowerpot, so the fingers are stretching upward like the stems of a flower.
- Glue the thin brown rectangle so it slightly covers the flowerpot and slightly covers the green handprint.
 Instructions - Making fingerprint or q-tip flowers:
- Use your thumb to stamp a large circle just above each of your finger flower stems. Dad often has the (mis)fortune of getting to use his big thumb as the center of our fingerprint flowers so we can have lots and lots of petals.
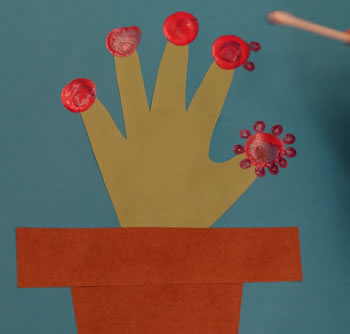 Use your pinky finger or a q-tip to stamp small petals all around the large center circle. You can use the same color or a different one. I usually squeeze two or three complimentary colors on a paper plate so the girls can swirl and mix them to their heart's content. Don't mix too many though or they'll end up with a murky color.
Instructions - Making tissue paper flowers:
- Make 5 to 10 squares of tissue paper about 2 inches by 2 inches (they don't have to be perfect.
- You can make single flowers or double flowers. If you are making doubles, step one is two put a dab of glue in the center of a piece and glue a second piece on top of it. Set them aside to dry a little.
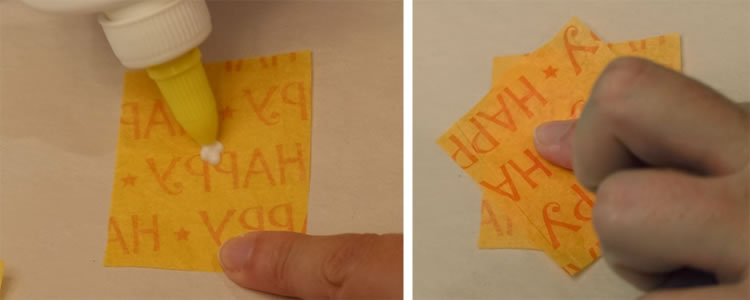
 Put the eraser end of a pencil in the center of your tissue paper and scrunch the tissue up around the pencil.
 - Put a dab of glue on the tissue and use the pencil to push it onto the paper where you want your flower.
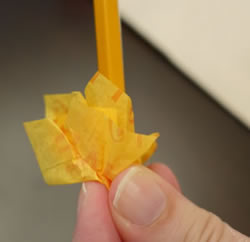
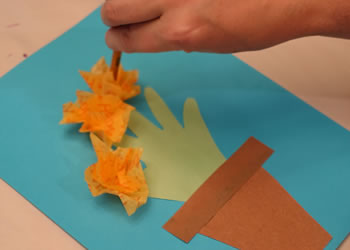 Hold it there for a second and then slide the pencil out, leaving the tissue on the paper (you may need to use your fingers to gently open the tissue so it's a pretty flower.
- Repeat until you've made all of your flowers.
- Optional: Using another color, make little scrunched up balls of tissue paper.
- Make a dab of glue in the center of each flower and drop your scrunched up ball in there as your flower center.

- Optional: Print a message at the top of your art!
Templates:
- After printing, close the template window to return to the main page.
- If the template doesn’t fit on one page, adjust your printer margins:
• In most browsers: Print → More settings → Margins → Minimum
• Or use Page Setup / Printer Setup in your printer dialog
Flowerpot Template color or B&W
Printable version of these instructions