
Tasha's Chinese pottery
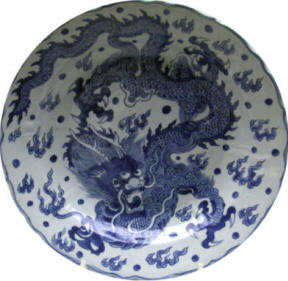
Authentic Ming dynasty porcelain plate
DLTK's Holiday Activities
Chinese Pottery
This is a simple craft to do as part of a China lesson. My daughter made her plate during Grade 9 -- however, the project is appropriate for any grade. Younger children will paint simpler images and older children or art students can make them more complex.
Dragons, fish and flowers are all good choices for decorating your project. Children can visit the library to look through pictures for inspiration.
In China, pottery has been an art form as well as a means of creating useful household items for 11,000 years -- Chinese pottery focused mainly on ceramics and porcelains. The early forms of pottery were, of course, quite simple but over the years the science and art of pottery making grew and became more complex.
By the mid 1300's, Chinese ceramics became the most advanced in the world. This was the time of the Ming Dynasty (from 1368 to 1644) -- decorative Ming vases remain priceless collectibles to this day.
In the 1400's, blue and white porcelain became technologically possible and very popular -- the Dutch blue and white porcelain was originally made as an attempt to copy this popular Chinese pottery.
Materials:
- scrap paper and pencil,
- paper plate,
- paint (we used acrylic blue metallic paint),
- paintbrush,
- scotch tape.
Instructions:
- Draw a rough design on a scrap piece of paper.
- You can use anything as your inspiration.
- One of the best sources of inspiration is to read a chinese myth or story and then draw a picture inspired by that myth.
- Remember you need to keep the image simple enough to paint it.
- Note: acrylic paint dries very fast. If your children are old enough to keep it off their clothes, it's a great option. If it does get onto something, wash it out immediately... once it dries, it is not washable.
- Use paint colours like blue to paint the design on your plate.
 Very simple dragon drawing:
- Draw a big letter S as the body.
- Add a big rectangle at the top of the S for a head. You can put it on an angle if you like.
- Add a couple of round eyes at the top of the rectangle.
- Add a "boomerang shape" as a jaw at the bottom of the rectangle.
- Add arms, forked tongue and horns.
 More challenging dragon:
- You can see a lot of the same basic shapes in the more complicated dragon as we had in the simple version.
- I often draw a simple version lightly in pencil and use that as a base for a more complex drawing.
- Thicken the S where it touches the ground and thin it out at the tip of the tail and neck.
- Add a few spikes on the back.
- Add some claws on the hands.
- Add some pointy bits to the head (jaws, teeth, hair from the top of the head).
- I moved the eyes down to the center of the rectangle for the challenging version because I liked how they looked better.
- Erase any of the "simple version" pencil lines.
Printable version of these instructions