DLTK's Holiday Crafts for Kids
 Recipe Card Holder
Fits standard sized recipe cards.
Materials:
- tongue depressors (big popsicle sticks -- you can get these at the craft store)
- 4 or 5 regular sized popsicle sticks
- glue,
- ribbon, string or wool
- poster or tempra paint (you could also use acrylic paint if you want a water proof version)
- optional decorations: woodsies, fun foam shapes, seashells, pretty stones, etc -- we used 6 teardrop woodsies and one circle woodsie to form our "flower".
 Instructions:
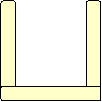
- Glue three big popsicle sticks together so they form a U shape.
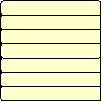 Add as many more big popsicle sticks as it takes to completely
cover the two sides of the U (about 7 or 8 all together)
Add as many more big popsicle sticks as it takes to completely
cover the two sides of the U (about 7 or 8 all together)- This is the back of your recipe holder
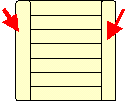 Flip it over
- Stack and glue about 2 more big popsicle sticks on each side of the U shape (we want our end result to be wide enough to fit a fair number of recipe cards... You can do more or less depending on how fat you want your holder to be.
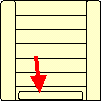 Stack and glue 4 or 5 regular sized popsicle sticks onto the
bottom of the U so the recipe cards don't fall out the bottom.
Stack and glue 4 or 5 regular sized popsicle sticks onto the
bottom of the U so the recipe cards don't fall out the bottom.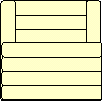 Glue 4 or 5 big popsicle sticks onto the creation to form the
front.
Glue 4 or 5 big popsicle sticks onto the creation to form the
front.- paint the creation -- we just used tempra paint, but you could use
acrylic paint if you like... It is more water proof (but doesn't
come out of clothes if the kids make a mess)
- Decorate as you like (we used woodsies)
- Attach string or wool to the back (we just masking taped it on).
Additional Thoughts:
- Cut out a fun foam rectangle to make a little sign for the front of the recipe card... The children can print on it in black permanent marker ("love you Grandma!", "Grandma's make great cookies", "Mom's the greatest!", that sort of thing).
- Look at the 'decor' of the kitchen... for example, maybe it's decorated with dairy cows... paint your project to go with that decor (white with black spots for the dairy cow example).
Printable version of these instructions