DLTK's Holiday Crafts for Kids
Spirograph Paper Plate Picture Frame

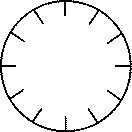
cut slits

1) start working with string

2) cross under the
plate to the next slit over
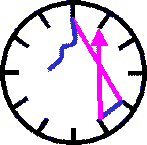
3) bring string next to
where you started
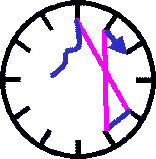
4) cross under the plate
to the next slit over
This project ends up looking remarkably like the spirograph pictures we used to make when I was young. It makes a nice gift for mom or grandma.
Materials:
- paper plate (small or large) (you can pre-paint the top, eating area, of your plate a nice color before starting this project if you like)
- wool, ribbon or string (quite a long piece)
- photo
- glue,
- scissors
Craft Instructions:
- Glue a photo in the center of the plate.
- Cut slits at equal distances apart around your paper
plate.
- slits should be about 1/2 an inch deep
- For young kids, space the slits far apart (less slits on the plate) -- as far as 2 inches apart.
- For older children (Age 8+) you can make the slits as close as 1/4 inch apart.
- For even older kids (Age 10+), use embroidery floss instead of wool. Do one entire spirograph in one color. Now change the initial spacing of the spirograph and do a second one in a complimentary color.
- You'll notice on the diagram that I've shown as
many slits as are on a clock (12 slits).
- If children are learning to read clocks, you can do this activity.
- When you're giving the directions, you would say, "start at 12 o'clock", "now go to 4 o'clock", "now up to 1 o'clock", etc.
- If you go to 5 o'clock first instead of 4,
you'll end up with a small opening for your photo. Use
your judgement based on the size of your photo
- Take a long piece of wool, string or ribbon and start
with the end at the back (leave about a 4" end so you can tie it
later).
This is a lot easier to explain in diagrams, so follow along the pictures on the right if you don't understand the directions.
Pink lines represent wool on the front of the plate. Blue lines show wool on the back of the plate.
- Put the wool through one of the slits and then pull it to one between 1/4 and 1/2 way across the plate.
- Cross under the plate to the next slit over (moving clockwise).
- Bring string up and go back to the slit at the top of the plate right next to where you started (moving clockwise).
- Cross under the plate to the next slit over (moving clockwise).
- Continue this process all the way around the plate.
Printable version of these instructions