 DLTK's Holiday Crafts for Kids
Chocolate Soda Recipe
(including printable "picture" recipe cards)
Alrighty... The first thing I have to say is that when I saw a recipe that required you to mix chocolate, ice cream and lemonade... I shuddered. But we put it together and it was a big hit. It's my 7 yr old Tasha's new favorite recipe (to make and to drink)
Er, don't let the kids know I told... but Tasha made SO MANY chocolate sodas one night before bed that her little sister ended up having a potty training relapse. We've since restricted the amount of pre-bed chocolate soda consumption in our household (yes daddy, that means you too!!)
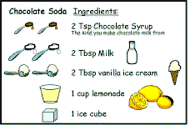
You'll notice from the image up above that the card has follow along pictures that should help the children figure out what they're supposed to do. The card has the ingredients on the front and the directions on the back.
RECIPE
(this is the same recipe as on the cards, but in writing only... I thought some folks might like to preview it).
- 2 tsp chocolate syrup (the kind you make chocolate milk with
- 2 Tbsp milk
- 2 Tbsp vanilla ice cream
- 1 cup lemonade
- 1 ice cube
In a tall glass, mix chocolate syrup and milk. Add ONE Tbsp vanilla ice cream. STIR
Add 2nd Tbsp vanilla ice cream, 1 cup lemonade and 1 ice cube. Stir lightly.
Serve with a straw.
Materials to make the cards:
- printer,
- paper,
- scissors,
- tape or glue.
- Optional: something to color with (if you use the B&W version)
- Optional: thin cardboard or index card
- Optional: clear contact paper (you can purchase at the office supply store. It's $5 Cdn for a big tube of it where we live)
Instructions for making the cards:
- Print out the template of choice. I like to print it on a heavy paper (I always cut the edges off of construction paper to make them 8 1/2 x 11 and use that).
- Cut out the template along the outside line. (if you accidentally cut down the middle it isn't a big deal since we'll be gluing the two halves together anyways).
- Fold down the middle to make a 4 x 6 card.
- Optional: cut a 4x6 piece out of thin cardboard (old cereal boxes!) and slide between the two halves of the recipe card.
- Glue or tape the halves together.
- Optional. Cover both sides with clear contact paper to make the recipe card last longer.
Printable Craft Templates:
- Close the template window after printing to return to this screen.
- Set page margins to zero if you have trouble fitting the template on one page (FILE, PAGE SETUP in most browsers).
Template (color) or (B&W)
Printable version of these instructions
...or visit our new printable recipes section to print this recipe on 3x5, 4x6 or full page.