DLTK's Holiday Crafts for Kids
 Egg Carton Flower Wreath Craft
A cardboard egg carton magically transforms into a pretty flower wreath. Young children will need help cutting out the cups, but will be able to complete the rest of the project with minimal assistance.
You can paint the egg cartons appropriate to the season (Kaitlyn made hers pretty spring colors):
- Christmas red would look like poinseittias.
- orange and black could be used for Halloween.
- blue and silver would make a pretty winter wreath.
- oranges, reds and golds would look nice in autumn.
Materials:
- paper plate,
- green paint (we like acrylic because it dries fast, but tempra paint works too)
- paintbrush
- scissors,
- cardboard egg carton (not styrofoam)
- paints for your flowers (we used pink, blue, yellow and white -- she used the white to lighten the pink and blue so the front petals were a bit lighter than the back petals -- Kaitlyn enjoys mixing paints to make her own colors!)
- Glue (white school glue or hot glue -- glue sticks will not work)
 Note:
Acrylic paint is (pretty much) not washable so young children should wear
old clothes and do their work away from carpet and other household
fabrics. If you catch it while it's wet, you can get usually get
it out but it dries very quickly so you have to be fast. Tempra
paints are more washable, but can still stain depending on the colors
you're using (I struggle getting blacks and reds out of light color
fabrics).
Note:
Acrylic paint is (pretty much) not washable so young children should wear
old clothes and do their work away from carpet and other household
fabrics. If you catch it while it's wet, you can get usually get
it out but it dries very quickly so you have to be fast. Tempra
paints are more washable, but can still stain depending on the colors
you're using (I struggle getting blacks and reds out of light color
fabrics).
Instructions:
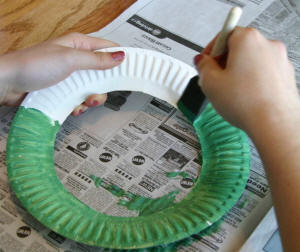
- Cut a circle out of the center of the paper plate to make a wreath shape.
- Paint the wreath shaped paper plate green.
- Set aside to dry while you complete other steps.
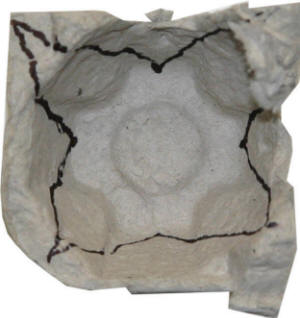 Cut a cup out of an egg carton. All of the scissor
work will require the assistance of an adult or older child.
Cut a cup out of an egg carton. All of the scissor
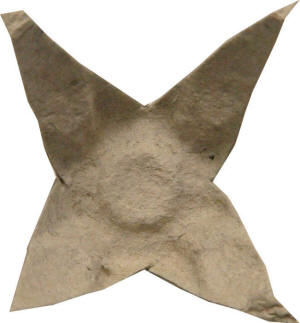
work will require the assistance of an adult or older child.- I've drawn lines on this one so you can see how I cut them out. Basically, you just cut out a pointed, four petal shape from each cup.
 Each flower requires two. The petals
will spread out more when you glue two cups together later in the project.
Each flower requires two. The petals
will spread out more when you glue two cups together later in the project.- Our 6 flower wreath took 12 cups (one full egg carton).
- Paint each of your shapes with your petal paint.
- We painted the inside and the outside of our petals as both sides will likely show when you display the wreath.
- Kaitlyn painted half her flowers blue and half her flowers pink. When she painted the center petals, she lightened the paint slightly with white so the petals on the outside would be a bit darker than the inside ones.
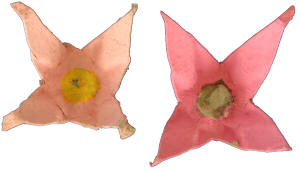 Paint the center of the flowers (we did
ours yellow). Our egg cartons have a little round dot in the middle...
perfect for painting the flower center.
Paint the center of the flowers (we did
ours yellow). Our egg cartons have a little round dot in the middle...
perfect for painting the flower center.- Let dry. If using acrylic paint, take this opportunity to wash out paint brushes, put away paints and tidy your work area. By the time you're done, your paint should be dry!
- Put a large dollop of glue on the back petal piece and squeeze the front petal piece so the petals are offset (when you look at the flower from the center, it will look like it has 8 petals).
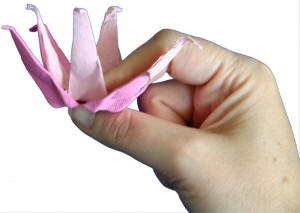 Squeeze the pieces together for two minutes (less time
if using hot glue).
Squeeze the pieces together for two minutes (less time
if using hot glue).
- This is a good time to get mom, dad, sisters, brothers, etc to pitch in and each squeeze two flowers together (one for each hand).
- Kaitlyn gave dad pink ones to hold and then teased him mercilessly and snapped photo of dad with his pretty pink blossoms!
- Our approach was to put on Kaitlyn's favorite song (Justin Beeber anyone) and dance around holding our flowers until the song was over. Dad did not dance. *wink*
- Arrange the flowers around the paper plate wreath in
even distances and a pattern you like and then glue them on.
- The flowers can't really be squished together too closely -- they need to be spaced out so they don't touch. Otherwise they have a tendency to knock each other off.
- Hang up on a door or wall to display OR put on the table as a centerpiece with a candle or small flower bouquet in the center. If you use a candle, do NOT light it (fire + cardboard and paint seems like a dangerous combo to me).
Printable version of these instructions