DLTK's Holiday Crafts for Kids
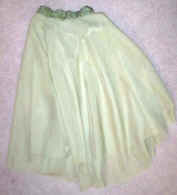 Easy Long Skirt or Mini Skirt
You can use the skirt for almost any little girl outfit: princesses, angels, fairies, forest spirits, ballerinas, little red riding hood, etc.
Where we live (Canada) everyone has winter jackets on while trick or treating, so there's no reason to worry too much about the top part of a costume. Accompany your skirt with a body suit or cute shirt from your closet to finish the costume. We usually make a cape to go with our costumes as it covers the jacket and finishes the look nicely (while still allowing for warm clothes).
Materials:
- square piece of fabric (the square should be twice the length you want your gown to be -- measure from your child's waist to an inch or two
above the ground for a long skirt or to an inch or two above the knees for a mini skirt).
- You can just buy a square yard (square meter) if you don't feel like measuring before you shop.
- fleece is expensive but very warm. It's a great choice in Canada if you're making a skirt that's going to be used by a few children year's in a row.
- lightweight cotton/cotton blend works well
- check out the cheap bin at Walmart or the fabric store. We purchased the material for Kaitlyn's long gown for $1.97 Canadian.
- piece of complimentary fabric or wide ribbon 5" wide. Ribbon's great as you don't have to worry about fraying edges. For size small it should be 18" long, medium 20" long and large 22" long.
- Piece of 1" or 2" wide elastic long enough to go around your child's waist.
- Optional: lace, fake fur or other trim to decorate the bottom. You can hot glue the lace on the bottom instead of sewing it (if you're like me and don't own a sewing machine, this is a BIG time saver).
Instructions:
- Fold your square of fabric into quarters. One of the corners will be the center of your material' figure out which this is!! We'll call it the CENTER CORNER
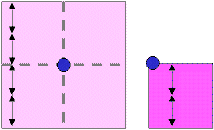
blue dot is center corner  Measure
a string the length you would like the skirt to be (measure from waist to
ankles or waist to knees), tie a pen or chalk (I use sidewalk chalk)
to one end and hold the
other end at the top of the CENTER CORNER.
Measure
a string the length you would like the skirt to be (measure from waist to
ankles or waist to knees), tie a pen or chalk (I use sidewalk chalk)
to one end and hold the
other end at the top of the CENTER CORNER.-
 Use your string to mark a quarter circle.
  Cut
off the bottom along your chalk marking (if you opened it up now you'd
have a big circle of fabric) Use pinking shears to prevent the edge
from fraying.
Cut
off the bottom along your chalk marking (if you opened it up now you'd
have a big circle of fabric) Use pinking shears to prevent the edge
from fraying.-


 Make
another quarter circle mark about 4", 4.5", or 5" from the CENTER CORNER and cut
off the CENTER CORNER along this quarter circle (this will be the waist).
Make
another quarter circle mark about 4", 4.5", or 5" from the CENTER CORNER and cut
off the CENTER CORNER along this quarter circle (this will be the waist).
- use 4" for small size
- use 4.5" for medium size
- use 5" for large size
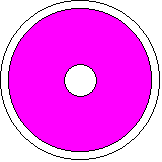
 When you unfold your material, it will look like a big donut. Isn't it great? No side seam to sew.
- If you used pinking shears and only plan to have the costume worn for one or two Halloween's you won't need to bother hemming the bottom edge.
 Optional:
- hot glue a strip of lace, face fur, ribbon or other trim along the bottom of the donut -- adding something to the bottom with hot glue will get rid of worries about fraying and save you hemming.
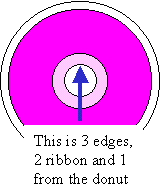 WAIST BAND
Now for the hardest part (but not that hard):
- Fold your 22" piece of ribbon or fabric in half, WRONG sides together and iron it flat if you like (I didn't bother ironing, I just folded as I was doing the next step).
- Pin this folded piece RIGHT sides together to the skirt
- Stitch the three edges together about 1/4 inch in. I hand stitched it, but you could use a sewing machine too.
- Trim the excess ribbon off the end
- Leave an opening for the elastic.
ELASTIC
- Cut your elastic so it fits around your child's waist
- Attach a safety pin onto the end and thread the elastic through the waist band, the waist band will bunch up
- Sew the ends of the elastic together and you're done!
Printable version of these instructions